
A Tailor's Guide to 7 Different Types of Plackets: Stitching Elegance
Placket is a very popular word in the world of garment construction. To read the definition and essential considerations for sewing a placket, please explore our previous blog post on "What is a placket?". Now, let's delve into the realm of different types of plackets.
Table of Content
#1 Continuous Bound Placket or One-Piece Placket
Continuous Bound Placket or One-Piece Placket is one of the types of plackets that are commonly seen on shirt sleeves. Created within the seam or slash, it offers a tidy opening for the wrist, facilitating easy wear and removal. Featuring a self-hem on one side and a bound piece on the other, this placket is suitable for square or V-shaped finishes. While ideal for kids' dresses, petticoats, and slip openings with cuffs or bands, it is not recommended for curved seams or heavy fabrics.
How to Sew Continuous Bound Placket or One-Piece Placket
Cuff Placement:
- Fold the binding on the side that will be on top when closed (towards the back of the arm).
- Perform a final press to ensure everything lays flat and appears as a beautiful bound placket from the right side.
Turning Inside Out:
- Fold the bound sleeve's right sides together, aligning the sides of the binding.
- Sew a diagonal line to secure the layers to the inside of the garment.
Final Stitching:
- Fold the binding over the original stitching, extending just beyond it.
- Stitch down the folded binding neatly, ensuring it covers the original stitch line.
Pressing Steps:
- Crease the seam allowance away from the sleeve towards the binding after the initial sewing.
- Press the outer edge of the binding inward by 1 centimetre (3/8 inch).
Sleeve Preparation:
- Open the sleeve slash and treat it as a straight line.
- Place binding (right side up) on the wrong side of the sleeve, aligning and sewing them together with a 6mm seam allowance.
- Allow the binding to spread open in the middle, catching only a few threads, approximately 6mm, to create a continuous bound placket.
#2 Bound and Faced Placket or Two-Piece Placket
The two-piece placket, also called a Bound and Faced placket, is the type of placket that is often used in making loose-fitting clothes. It involves two parts made from the same fabric as the garment. The facing is narrower, and the bound part is wider. When used on sleeves, the wider bound piece is placed over the narrower facing piece, creating a neat edge with either a square or triangular shape.
For the waistline, it's the opposite – the narrower facing piece goes over the wider bound piece. To ensure it's secure and looks polished, the edge of the placket is stitched tightly. This placket design combines strength with a neat appearance, making it a good choice for clothes that need both durability and a classy finish.
How to Sew Two Piece Placket or Bound and Faced Placket
Tools and Materials:
- Cotton fabric, pattern square, straight ruler, tailor's chalk, pin, shear, small scissor, contrasting thread, hand sewing needle, iron box, measuring tape, seam ripper, and sewing machine are required.
Steps for Two-Piece Placket:
- Step 1: Measure, mark, and cut fabric pieces.
- Step 2: Mark seam lines with a half-inch seam allowance.
- Step 3: Pin and baste the smaller facing to one fabric piece.
- Step 4: Stitch on the seam line, remove the basting, and iron the facing.
- Step 5: Stitch close to the edge on one side of the fabric.
Continuation of Steps:
- Step 6: Pin and baste the bigger 'facing' to the other fabric piece.
- Step 7: Stitch along the seam line, remove the basting, fold it, and iron the facing.
- Step 8: Pin the sample pieces together, stitch along the seam line and turn the sample 90 degrees.
- Step 9: Fold, iron, and pin the sample pieces for stitching.
- Step 10: Stitch the sample pieces together.
Final Steps and Review:
- Step 11: Hem around folded edges, trim, and remove pins.
#3 French Placket
The French placket is a beautiful shirt design that creates a seamless, one-piece fabric appearance. French Plackets are made by folding the fabric on the shirt front, and then sewing from the inside. As a result French packet's exterior looks clean. Despite its plain design, it is suitable for both formal and casual shirts.
One distinctive feature of the French placket is its sleek and tidy look, enhancing the overall aesthetics of the shirt with a minimalistic design. The fabric is precisely folded back, and buttonholes are expertly stitched inside, ensuring a smooth and uninterrupted exterior. This meticulous construction contributes to the shirt's elevated appearance, making it a popular choice for those seeking a tailored and polished look.
French Plackets are similar to two-piece plackets in some aspects, using two pieces of fabric. But unlike normal two piece plackets, the width of the two pieces of fabric for French plackets are of the same width. Commonly found on the front of shirts, precisely where buttons and buttonholes are positioned, this design choice adds a touch of sophistication to the garment. The French placket's versatility allows it to seamlessly blend into various shirt styles, making it a timeless and favoured option for those who appreciate both simplicity and refinement in their wardrobe. Ironing this type of shirt placket may present a slight challenge due to its interior stitching.
How to Stitch a French Placket?
The French front placket is a stylish design technique that conceals stitches on the exterior, enhancing the formality of shirts.
Materials and Tools:
- Cotton fabric
- Pattern square
- Straight ruler
- Tailor's chalk
- Interfacing
- Shears
- Small scissors
- Contrasting thread
- Iron box
- Measuring tape
- Sewing machine
Step 1: Prepare Fabric Pieces
1.1 Measure and mark a 10x10 inch square on a double layer of cotton fabric using a pattern square, measuring tape, and tailor's chalk.
1.2 Cut the marked squares using shears.
1.3 Cut two strips of interfacing, each measuring 10 inches by 1.5 inches.
Step 2: Attach Interfacing
2.1 Place the smooth side of the interfacing on the right side of the cut edge of both fabric pieces.
2.2 Join the two layers with a 1/4 inch seam allowance using a sewing machine. Start and end with a reverse stitch, and cut thread ends.
2.3 Repeat the process for the other fabric piece.
Step 3: Iron the Interfacing
3.1 Fold the fabric pieces and iron the interfacing by turning them to the wrong side along the seam. Press it down.
3.2 Turn the fabric pieces around and press with the iron box along the whole length, ensuring the interfacing adheres to the fabric.
3.3 Fold the seam 1/4 inch over to the wrong side and press. Repeat for the other fabric piece.
Step 4: Button Stand and Buttonhole Placket
4.1 One fabric piece becomes the button stand placket, and the other becomes the buttonhole placket.
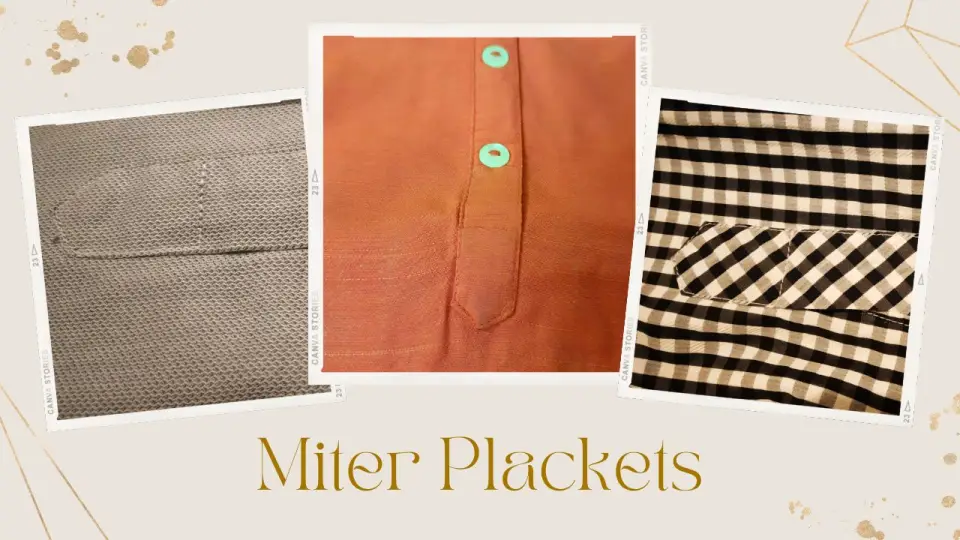
#4 Miter Placket
The Miter placket, often called a triangular placket, also known as a tailored placket, enhances both the decorative appeal and fabric strength. You can see this type of placket in the neck openings of Bengali Punjabi, neck openings of Kurta, and sleeve openings of formal or informal full-sleeve shirts. Primarily employed in the neck and sleeve openings of men's shirts and children's dresses, it finds application in women's dresses that require a neckline opening. In garments for women and children, the strip material used for the placket may vary to add a decorative touch.
Occasionally, the Miter placket transforms into an integral decorative element of the overall design, contributing not only to the fabric's durability but also to the aesthetic charm of the clothing.
How to Stitch a Miter Placket
#5 Zipper Placket
A placket is basically a piece of fabric that is used to surround and reinforce an opening of the garment. With that definition, Zippers are also one kind of packet. Zips are generally attached with tapes and available in multiple shapes. It is chosen based on the size and colour of the placket. Clothes with zippers are attractive and easy to wear. It is used in trousers, skirts, frocks, handbags and other decorative purposes. The zipper placket allows for a secure closure while maintaining a neat and finished appearance.
#6 Covered Placket or Fly Front Placket
A covered placket, also known as a fly front, is a great way to close fancy clothes, like nice pants, skirts, or dresses. It has an extra piece of fabric that hides the zipper or buttons, making the outfit look clean, smooth, and stylish. It gives clothes a polished and professional finish.
How to Sew a Covered Placket or Fly Front Placket
#7 Faux Placket
A false placket or a mock placket is an ornamental element that copies the appearance of a functional placket without actually serving the purpose of opening or closing. It is often employed in fashion to add apparent interest to garments, providing the illusion of a traditional closure without the need for buttons, snaps, or zippers.
Easy Faux Placket Sewing Tutorial – No Buttonholes Needed
Hey there, sewing pals! Today, I will guide you through an awesome sewing hack – adding a faux placket to your dress or top. It's super easy. No need to stress about buttonholes, and you'll end up with a cute look. Let's dive in!
Materials You'll Need:
- Your chosen dress or top pattern (I'll be using the staycation dress).
- Fabric of your choice (I'm using a ribbed knit).
- Pins.
- Buttons.
- Sewing machine.
Step 1: Prepare Your Pattern: Take your front pattern piece and add an inch to the centre front. If your fabric has lines, use them as a guide. If not, mark the inch all the way down, ensuring it's even.
Step 2: Cut Your Fabric: Cut out your pattern piece as you normally would, but now, with the added inch on the front. The rest remains the same.
Step 3: Mark Your Placket: Fold your front piece in half and mark the centre. Open it up and mark an inch from the top and bottom, creating a rectangle. If you're unsure, using pins can be a helpful guide.
Step 4: Overlap and Pin: Overlap the fabric by lifting and bringing the inch markings together. Make sure it's even and pin it in place.
Step 5: Sew Your Placket: Head to your sewing machine. Sew a straight stitch along one side of the rectangle, about an eighth of an inch from the edge. Repeat on the other side. This creates your faux placket.
Step 6: Finishing Touches: Trim any excess fabric and continue sewing your dress or top as usual. Remember, the inch you added earlier is only for the placket.
Step 7: Add Buttons: Once your garment is almost done, measure your placket length. Decide on button placement and sew them on. You can go bold or subtle, and it's up to you.
Step 8: Admire Your Work: Stand back and admire your beautiful faux placket. It's that easy and adds a unique touch to your garment. I find hand-sewing buttons therapeutic but use your preferred method.
That's it, sewing champs! You've just added a faux placket like a pro. Experiment with fabrics and button styles to make it your own. If you have any questions, drop them below in the comments section. Happy sewing!
Conclusion
Plackets are a versatile and elegant way to add a touch of sophistication to your garments. From classic French plackets to modern zipper plackets, there is a placket style to suit every taste and occasion. With a little practice, you can easily sew your own plackets and elevate your sewing projects.
Here are a few tips for sewing plackets:
- Choose the right fabric. Fabrics with a smooth finish, such as cotton poplin or silk, are ideal for sewing plackets.
- Use a seam ripper to carefully remove any mistakes.
- Press your seams carefully to achieve a professional finish.
- Embellish your plackets with decorative stitches or buttons for a personalized touch.
With these tips in mind, you're well on your way to mastering the art of sewing plackets. So get creative and start adding some elegance to your wardrobe!
Now that you have mastered the concept of plackets in sewing let us delve into other sewing topics. Let us jump into another exciting topic, i.e., darts in sewing.