
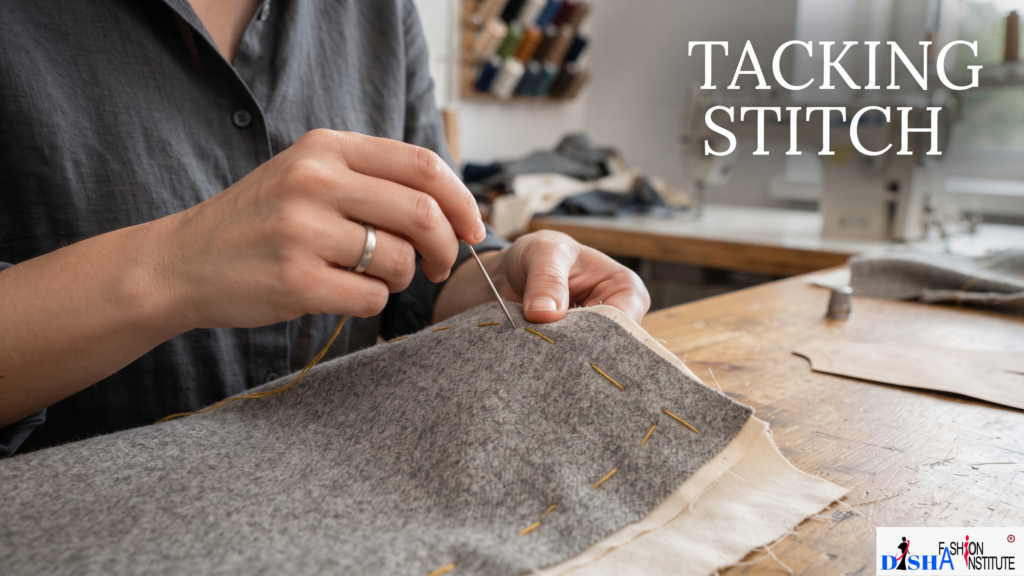
If you are wondering what is tacking stitch, it is essentially a temporary stitch used to hold fabric in place during garment construction or fitting.
Unlike permanent stitches, tacking is not normally intended to remain in the finished garment. Once the final stitching has been completed, the temporary threads can be carefully removed.
Tacking is also commonly referred to as basting. The terms may be used interchangeably in many sewing situations, although the exact terminology can vary depending on the sewing method or region.
Why Is Tacking Stitch Used?
The main purpose of a tacking stitch is to temporarily hold fabric in the correct position before permanent stitching.
Some common uses include:
- Holding fabric layers together
- Preparing seams before machine stitching
- Holding garment pieces during fitting
- Positioning linings
- Holding collars and cuffs in place
- Temporarily securing hems
- Matching checks and stripes
- Transferring pattern markings
- Holding trims or other garment details
Tacking can be particularly useful when pins alone do not provide enough control or when you need to make adjustments before completing the final seam.
Types of Tacking Stitches
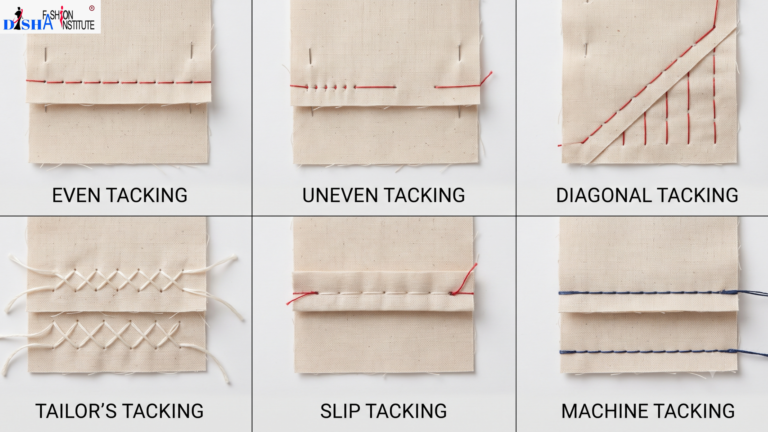
There are several types of tacking stitches, and each can be useful for a different sewing purpose.
1. Even Tacking
Even tacking uses stitches that are approximately equal in length and spacing. It provides controlled temporary stitching and can be useful when accurate positioning is required.
2. Uneven Tacking
Uneven tacking uses stitches of different lengths. It can be used for general temporary holding where highly precise stitch spacing is not necessary.
3. Diagonal Tacking
Diagonal tacking uses slanted stitches across fabric layers. It can help keep larger sections or multiple layers together and reduce movement during sewing.
4. Tailor’s Tacking
Tailor’s tacking is mainly used to transfer important pattern markings from a paper pattern onto fabric. It can indicate locations such as darts, pockets, buttonholes, or other construction points.
The loose threads act as temporary markers that can be separated between fabric layers when needed.
5. Slip Tacking
Slip tacking can be useful when accurately matching patterned fabrics, such as checks or stripes, along a seam. It helps hold the fabric in position before the permanent seam is sewn.
6. Machine Tacking
Machine tacking uses a long straight stitch made with a sewing machine. It can be a quick way to temporarily hold fabric pieces together before permanent stitching.
How to Sew a Tacking Stitch by Hand
Tacking by hand is simple and does not require a complicated technique.
Step 1: Prepare the Fabric
Place the fabric pieces together and align the edges, notches, or markings that need to match.
Step 2: Choose the Thread
Choose a thread that is easy to see and remove. A contrasting colour can make temporary stitches easier to identify.
Step 3: Thread the Needle
Select a suitable hand-sewing needle and thread it securely.
Step 4: Start Stitching
Bring the needle through the fabric from the wrong side and begin making long, loose stitches along the area that needs to be secured.
Step 5: Continue Along the Seam
Keep the stitches sufficiently spaced and follow the required seam or construction line.
Step 6: Keep the Stitching Temporary
Do not make the stitches unnecessarily tight or difficult to remove. The purpose is simply to hold the fabric securely until the permanent stitching is completed.
Step 7: Sew the Permanent Seam
Once the fabric is correctly positioned, sew the final seam using the appropriate permanent stitch.
Step 8: Remove the Tacking
Carefully remove the temporary stitches after the permanent seam has been completed. Take care not to damage the fabric.
Where Is Tacking Stitch Used?
Tacking stitch has many practical applications in garment construction.
Garment Fitting
During garment fitting, temporary stitches can hold sections together while adjustments are checked. This makes it easier to modify the garment before final sewing.
Seams
Tacking can prevent fabric layers from shifting while preparing a seam for machine stitching.
Linings
A lining can be temporarily held in its correct position before it is permanently attached.
Collars and Cuffs
Tacking can help keep multiple layers aligned while constructing collars, cuffs, and other detailed garment sections.
Hems
A folded hem can be temporarily secured with tacking before the final hem stitching is added.
Pattern Marking
Tailor’s tacks can transfer important construction points from a pattern to the fabric.
Checks and Stripes
Tacking can help maintain accurate alignment when working with fabrics that have checks, stripes, or other repeating patterns.
Tacking Stitch vs Basting Stitch
Tacking stitch and basting stitch are often used to describe temporary stitches that hold fabric before permanent sewing.
Tacking Stitch | Basting Stitch |
Usually temporary | Usually temporary |
Holds fabric or garment sections in position | Holds fabric layers before final sewing |
Used in fitting and garment construction | Used in garment construction and other sewing projects |
Often made with long, loose stitches | Often made with long, loose stitches |
Removed after permanent stitching | Removed after permanent stitching |
In many sewing contexts, the two terms can mean essentially the same thing.
Tips for Neat Tacking
Keep these tips in mind when using a tacking stitch:
- Align the fabric carefully before stitching.
- Use a contrasting thread when easy removal is important.
- Keep temporary stitches loose enough to remove easily.
- Choose an appropriate stitch length.
- Use smaller stitches where more control is needed.
- Check notches and pattern markings before permanent sewing.
- Avoid pulling the thread too tightly.
- Remove temporary stitches carefully after completing the final seam.
- Make sure the tacking thread does not become permanently trapped where it needs to be removed.
Good preparation can make the final sewing process much more accurate and efficient.
Common Tacking Stitch Mistakes
Beginners often make a few simple mistakes when learning tacking.
Making stitches too small: Very small stitches can be difficult to remove and defeat the purpose of temporary stitching.
Pulling the thread too tightly: Excessive tension can distort or pucker the fabric.
Misaligning the fabric: Tacking cannot correct incorrectly positioned fabric, so always align the pieces before starting.
Using difficult-to-remove thread: A temporary thread should be easy to identify and remove.
Forgetting to remove the stitches: Tacking is normally temporary, so check the garment after permanent stitching and remove unnecessary threads.
Using the wrong tacking method: Different situations may require different types of tacking, such as tailor’s tacks for markings or machine tacking for quickly holding seams.
Final Thoughts
Tacking stitch is a simple but valuable sewing technique that can make garment construction more accurate and manageable. It temporarily holds fabric in place, allowing you to check alignment, make fitting adjustments, and prepare seams before permanent stitching.
Understanding what is tacking stitch and learning the different types of tacking stitches can help beginners develop better control over fabric and improve their sewing accuracy. From basic temporary seams to tailor’s tacks and pattern matching, tacking is a useful skill for many sewing projects.
Join Disha Fashion Institute
You can also visit our Homepage or explore our different Course pages to learn more about our programs. If you need any guidance related to courses like Basic Tailoring, Diploma in Tailoring, Fashion Designing, or other fashion-related courses, feel free to contact us. Our team will understand your requirements, skill level, and career goals to guide you toward the most suitable course that matches your learning needs. you can check our YouTube Channel we post our Institute and tutorial over there.